Category: DIY project

Useful DIY

Hey guys,

So I found an awesome DIY on Pinterest that so many people could use in front of their house. Lost house keys are far too common, why not have a spare available that can be safely concealed outside of your home? I love this idea so much, so, I figured I would share this DIY with you all. I hope you try it!

Here are the materials you will need:

Glue (strong glue)

An empty pill bottle

A rock with a flat edge or bottom

Key


Step 1: Glue the cap of your pill bottle to your designated rock.

Screenshot (78)


Step 2: Place your spare key into the bottle and close the lid tightly. And there you have it!

Screenshot (79)


Here is the finished product:

Screenshot (80)


I think this is a really great way to save money and time. Thanks for tuning in, look out for my next post!


Cork Screws Recycled Into Home Decor

Hey guys,

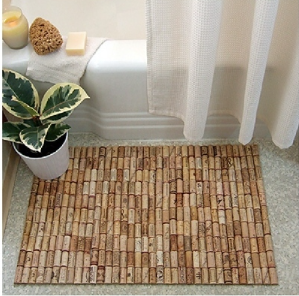
So I found an awesome way to recycle cork screws! This DIY is basically exactly what it sounds like. If you have a bunch of leftover cork screws, you can use them to make something awesome. For this post, I wanted to show you guys a door mat made entirely of cork screws.

Screenshot (61)

All that you need for this DIY is a shelf liner, cork screws and glue! As shown in the image below, you will simply glue the cork screws to the shelf liner (I would recommend using a strong glue substance).

Screenshot (63)

Continue gluing the cork screws to the shelf liner until it is completely full. Once you are finished, let it dry and place it in whatever room in your house that it suits best! Screenshot (61)

Thanks for reading! Stay tuned for my next post! ❤


DIY Halloween Decoration

So Halloween is just around the corner and in this last-minute society we live in, it is quite probable that many of us aren’t sure if we are going to decorate or not and if we are, we aren’t sure of what to decorate or how to decorate it. Now, if you are one of those prepared people then that’s awesome but for all the rest of you, here’s an awesome idea.

383a81ea0808b5dfe6bd7338aaa4ad82So as you can see in the image, there appears to be a long row of spiders trailing toward the lock on  the door. Creepy, right? Well, I think this DIY is just enough to get under almost anyone’s skin if it is dark out and they walk up to a door that is infested with plastic spiders that look very real in the nighttime. This project, as you may guess is pretty simple. Let’s get started!

Materials:

Tape (preferably a strong kind)

Plastic toy spiders

So once you have your materials set up, you will begin by ripping off a piece of tape (Ideally when rolled, it will fit on the belly of the spider without being seen), you will then roll the tape to fit on the belly of your spider as previously stated. Once you have your tape, place it on the belly of one spider and then stick it to your door! You will repeat this procedure for each spider, working toward creating the pattern you see in the image above so that your spiders appear as if they are moving in a line. Your spiders will end at the lock on the door and if you do not have a lock, you can have your spiders end at the door knob!

And that’s it! Hopefully you guys have fun making this project, tune in for my next post! ❤

Ping-Pong Lights

Hey guys! So I saw an awesome project that would make anyone’s room a hundred times better…. Ping-Pong lights! So the materials you will need are Ping-Pong balls, a scalpel (or a similar tool), and multicolored LED lights on a string as depicted below:

Screenshot (41)

As depicted above, once you have all the materials, you will then take your scalpel and cut a tiny hole into each Ping-Pong ball (for the lights to fit into).

Screenshot (42)

Once you have cut the holes into each Ping-Pong ball, you will then take the lights on your wire and stick each Ping-Pong onto the lights until each light is covered by a Ping-Pong. 🙂Screenshot (43)And once you are finished adding each Ping-Pong ball, you are all set to hang up your lights! Just make sure that the holes that you carve into the Ping-Pongs are the right size for your lights so that they aren’t falling off!

I love this craft because not only is it easy to do, but it also looks really good to use as a decoration in your room. It can make any dorm room look great, or even for a special holiday this works as a fantastic element of décor to make almost any house stand out from all the rest! I hope you guys try this out and most importantly, I hope you guys have fun when doing this project.

Enjoy! Tune in for my next post. ❤


Weekly Calender DIY Project

Hey guys!

So if you don’t already know, I am in college and therefore always busy! So, I found this awesome DIY project that will help anyone who is almost always on the go, including myself, to stay organized. This isn’t your average weekly calendar, this calendar is meant for great room décor as well as recording your weekly events!

Materials:

Gorilla Glue

7 picture frames

Decorative paper

Paint (optional)

Now, you begin by inserting your decorative paper in each frame in the way you would like them to be seen. Then, you glue the picture frames together in whatever order you choose. Below is an example of how the calendar is glued together.

DIYimage

After gluing together the frames, your project is complete, unless you choose to paint the frames and in that case, you will paint each frame carefully with your desired color and then you are finished! I love this project because it is simple, useful and cheap.

Foundonthecarodiaries.com

I hope you guys enjoyed my post! Tune in for the next one! ❤